We are two individuals, sister-in-laws, and friends who are striving to thrive and be our personal best as well as making our surroundings a better place to live! Connected by faith, family, friendship, photos, and writing, we just want to share our journey with you!

Saturday, January 29, 2011

Christmas a la Winnipeg

Honestly... can anyones nephew beat the cuteness in this photo?

I think not. Pure tobogganing joy right there.

Here's a few photos from our wonderful Christmas holiday! Jay, Dan and Noah were able to fly in for a few weeks over Christmas and we had a blast!

Sisters :)


I may have had a tumble or two down the hill, but that was part of the fun! :)

Noah enjoying his 'first' Christmas (well the first Christmas where he was excited for Santa to come!)... he may have been a little overwhelmed after the first 5 presents, but he was still such a joy

Me and my papa...


... and mom!

Santa Alfie, myself, my brother Nick and his girlfriend Steph

Just us girls

We took Noah bowling for the first time! Ha ha and sometimes he even beat us! Ok, all the time he would beat me, sometimes he would beat the others :)


It was so sad to see them go! Lucky for me, I'll be seeing them in about a week! I'm flying out to Victoria over my birthday :)

I hope all of you had a Christmas filled with joy and family!

Thursday, January 27, 2011

End the night with cosmic cookies?

You know you want them....


Whip up a batch of Cosmic Cookies when I am so busy I shouldn't even look in the direction of the oven?

Why not?

P.s. Search "Cosmic Cookies" for the past post and recipe!

Mmm...

Saturday, January 22, 2011

The most delicious vegan burger and sesame potato fries!!!


Dan and I usually eat more veggie burgers in the summer (bbq time), but we were feeling like a delicious burger and I was craving sesame potato fries so I set out to make a new recipe! It was a GREAT success!

If you have EVER been to Boon Burger in Winnipeg, Manitoba, then you know, that they have the most AMAZINGLY delicious burgers and fries and basically ANYTHING/EVERYTHING else that they serve....and it's all vegan!!!! I love going to Winnipeg to see my family and I'm not going to lie....to hit up Boon Burger!!! When we were in Winnipeg over Christmas, I frequented it TONS! I am constantly praying that they open more lil' Boon Burgers and have hopes that eventually there may be a Boon Burger in B.C.!!!! Anyways, I made up my sesame potato fries recipe to what I thought would closely replicate the fries at Boon Burger and mine turned out DELICIOUS!!!

The burger recipe I got from one of my favorite cookbooks: refresh by Ruth Tal. I had initially been intimidated by the longer list of ingredients but making these burgers was really easy and they are the first vegan burger patties that I have made that hold together really really well (no crumbling)! They also taste amazingggg! They have quite the zing effect with the cayenne, and curry powder so if you aren't into a little spice then just withhold those ingredients! But Dan and I loved them!
What I love about the Fresh Burger recipe is that it makes 6 patties and I imagined 6 dinky little patties but it made 6 perfect-sized patties!!! Dan and I make 2 so we used 2 patties the night that I made them and then we invited my mom and brother over to enjoy the final four the following night! So delicious! Noah is a little young to eat an entire burger to himself so he ate the sesame fries, a few bites of mama's and the toppings!!!

Now for the recipe! Enjoy this meal when you are in the mood for an AMAZING burger and fries and are HUNGRY (be aware that you will feel very full afterwards...but not greasy!!! YAY! We had NO fast-food effect after consuming these!!! In fact, we were marveling at the high-quality ingredients that are in the patties! So healthy and delicious = a win, win!!!

Fresh Burger Mix (from the Refresh cookbook by Ruth Tal):

Ingredients:

1 cup of filtered water
1/2 cup of uncooked hulled millet
1/2 cup of uncooked pearl barley
3 Tbsp. of sunflower seeds
1 1/2 Tbsp. of chopped almonds
1 clove of garlic, chopped
2 Tbsp. of chopped parsley (*I chose to use basil instead of parsley and LOVED it)
1/2 red onion, peeled and chopped
1/4 cup of grated carrot
3/4 cup of firm tofu, chopped
3 Tbsp. of grated beets
1 1/2 Tbsp. of tamari (I used Shoyu Sauce)
2 Tbsp. of spelt flour
2 Tbsp. of Engevita (inactive) yeast
1/4 tsp. of cayenne
1/4 tsp. of chili powder
1 tsp. of curry powder
1 tsp. of sea salt
1 tsp. of cornstarch
3 Tbsp. of mixed herbs (*I added a mixture of oregano, thyme, rosemary and garlic powder)
2 Tbsp. of carrot juice or water (if needed) *I added 2 Tbsp. of low-sodium veggie broth instead of carrot juice or water - just a personal preference!

Method:

1) Put the millet, barley and 1 cup of water in a small pot over high heat and stir. Bring to a boil, then reduce heat and let cook until the water is absorbed. Put the grains in a large mixing bowl. Let cool.

2) While the grains are cooking, grind the seeds and nuts in a food processor. Add these to the ingredients in the mixing bowl.

3) In the same food processor, puree the garlic, parsley/basil, onion, carrot and beets. When they are chopped fine, add the tofu and process until smooth.

Such a beautiful colour thanks to the beets!

4) Put this mixture in the mixing bowl with the nuts, seeds and grains. Add the remaining ingredients - except the 2 Tbsp. of liquid (carrot juice, water or broth), and mix thoroughly with a large spoon. Add the 2 Tbsp. of liquid if the mix is too dry for shaping into patties.

5) Divide and form into 6 patties.

6) Fry, broil or grill the burgers until slightly crisp and brown on both sides, about 5 minutes each side.
* Initially I thought about cooking the patties on a frying pan on the stove-top but then decided that it would be too tedious and opted for broiling...it was SO EASY! I just placed the 6 patties onto a pan that I had first lined with parchment paper. I put them into the oven for about 5-7 minutes and then flipped them, and cooked them for a further 5 minutes! They turned out amazing!

Fresh Burger Patties before going into the oven!

Fresh burger patties fresh out of the oven!


I am going to argue that these just might be the most delicious vegan burgers I have ever had!!!! Okay, Boon Burger still has one up on me :) Or maybe, it's because when I go there, they have this super cool ambiance and the staff are super friendly and they make all the food I order for me!!! That's a really NICE treat!!! But these burgers will now gladly satisfy me until my next trip to Winnipeg!!!

As for the fries, SUPER EASY!

Jay's Sesame Potato Fries:
serves 3-4 people

Ingredients:

1-2 yukon gold potatoes, sliced into your ideal french-fry size!
1 sweet potato, sliced into your ideal french-fry size!
2 Tbsp. of sesame seeds
2 Tbsp. of either olive oil OR coconut oil (melted coconut oil if it's solid)
sea salt and pepper to taste

Method:

Preheat the oven to 350'F.
Place the sliced potatoes and sweet potatoes onto a baking sheet and drizzle with oil. Sprinkle sesame seeds over top as well as the sea salt and pepper.
With clean hands, massage the potatoes so that they all absorb some oil and are coated with sesame seeds.
Place in the oven and bake for 10-12 minutes. Take out of the oven and flip the potatoes and then place back into the oven for an additional 10 minutes. You should be able to easily pierce the potatoes with a fork when finished!

Enjoy these on their own or with ketchup or miso gravy!

I really hope that you enjoy the burgers and fries, whether together or separately! They are truly so delicious and you feel like you are treating yourself but without huge guilt because you are still nourishing your body and providing healthy alternatives for you and your family!
*A little known fact about me: I have a secret obsession for millet! Perhaps it's because I rarely cook with it but I find millet so intriguing and I love the little crunch that it provides! Seeing millet in this recipe SOLD ME!!! I loved the abundance of flavor as well that this burger has!


Another cool thing about the Refresh cookbook is that as well as having an amazing burger recipe, they also list different toppings/ideas for serving your burger. For example they have names like the Life Burger, Miso Burger, Thai Burger and Mushroom Onion Burger. If any of these sound appealing than they tell you how to top the burger of your choice and they even have the recipes for any of the dressings that they involve (examples - miso gravy, herb tofu mayo, and thai peanut sauce)....sweet!!!!


I topped my burger with daiya cheese (melted into my patty - yum), lentil hummus, ketchup, avocado (a favorite of mine), cucumber, spinach, sprouts, and mango chutney (SO DELICIOUS)!!!


Dan topped his burger with miso gravy, daiya cheese, lentil hummus, cucumber, spinach, and sprouts!

We used Ezekiel buns :) Dan also drizzled miso gravy over his fries but I prefer ketchup so that's what I used!


Thursday, January 20, 2011

Gluten-Free, Vegan Apple-Cinnamon Muffins! Delish!


I was going to blog about the dinner I made last night, but after reading Ally's latest post about the Babycakes cookbook, I thought that I should first write about the first recipe that I along with my lil' helper Noah made from the Babycakes cookbook today: we made the most delicious Apple-Cinnamon Muffins! Ally had told me how much she loved Babycakes, and I also received it for Christmas. So alas, I cracked it open, flipped through the pages and decided that I just HAD to try baking these apple-cinnamon muffins! I feel personally like Babycakes gave me a similar feel as Alicia Silverstone's The Kind Diet. I love how random pages have celebrity fans who may or may not be vegan and have wrote in about how much they love the NYC bakery! YAY! This always excites me and makes me more interested in trying recipes. I also love how even though this book consists of bakery-inspired recipes, they also do make most of these recipes more healthy than your average crap-cake! I love the pictures too!

So this morning, Noah and I woke up and started our day by peeling Pink Lady and Granny Smith Apples (organic and B.C. apples - yay), and then we roasted them! The house was filled with the most AMAZING smell ever and it made my entire morning! In the late-afternoon we used 1 cup of the cooked apples to make the Apple-Cinnamon muffins that are from Babycakes. I hope you enjoy them as much as we are! These muffins have a lovely and not over-the-top sweet but rather subtle-sweet flavor, are not only vegan but also gluten-free, and have a great cinnamon taste for those cinnamon-lovers out there (Noah and I are definitely cinnamon lovers)! I really like how the author Erin McKenna doesn't use a lot of refined sugar. I used raw agave to bake these and they turned out great :) ENJOY!

Apple-Cinnamon Muffins

First make Roasted Apples:
Ingredients:

1) 1 pound of granny smith apples, peeled, cored, and diced into 1-inch cubes
2) 1 pound of pink lady apples, peeled, cored and diced into 1-inch cubes
3) 1 tablespoon of ground cinnamon
4) 1/2 cup of agave nectar
5) 1/4 cup of fresh lemon juice

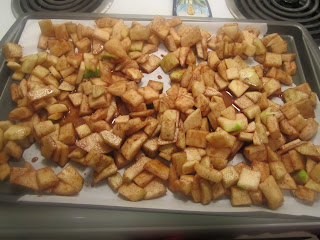
Apples about to go into the oven :) MMM!

Steps:

1) Preheat the oven to 325'F. Line a baking sheet with parchment paper.
2) Peel, core and dice into 1-inch cubes 1 pound of Granny Smith Apples AND 1 pound of Pink Lady Apples. *I didn't know how much 1 pound was and so I googled it and learned that apparently 3 medium apples = 1 pound of apples (2 large apples = 1 pound of apples and 4 small apples = 1 pound of apples)...I couldn't tell if my apples classified as medium or large so I used 4 pink lady and 2 granny smith (yes I have a personal preference)!
3)In a medium bowl, toss together the apples, cinnamon, agave nectar and lemon juice until the apples are completely coated. Spread the mixture over the prepared baking sheet.
4) Bake the apples on the center rack for 35 minutes, rotating the sheet 180 degrees after 20 minutes. The apples will be soft. Let the apples stand for 30 minutes, or until completely cool. (The roasted apples can be stored in an airtight container in the refrigerator for up to 1 week).
*If you are baking the muffins right away, then keep the oven temperature at 325'F. If not, then turn the oven off and then when you are ready to bake the muffins, preheat the oven to 325'F.

My little helper!


Apple-Cinnamon Muffin Recipe:
Ingredients:

2 cups of Bob's Red Mill Gluten-free All-purpose baking flour
2 teaspoons of baking powder
2 teaspoons of baking soda
1 teaspoon of xanthan gum
1 teaspoon of salt
2 tablespoons of ground cinnamon
1/4 teaspoon of ground nutmeg
1/2 cup of coconut oil
2/3 cup of agave nectar
2/3 cup of rice milk
2 tablespoons of pure vanilla extract

Method:

1) Make sure the oven is set at 325' F. Line a standard 12-cup muffin tin with paper liners.
2) In a medium bowl, whisk together the flour, baking powder, baking soda, xanthan gum, salt, cinnamon and nutmeg. Add the oil, agave nectar, rice milk, and vanilla to the dry ingredients and stir until the batter is smooth. Add 1 cup of the roasted apples and stir to distribute.
3) Pour 1/3 cup batter into each prepared cup. Bake the muffins on the center rack for 22 minutes, rotating the tin 180 degrees after 15 minutes. The finished muffins will be golden brown, and a toothpick inserted in the center will come out clean.
4) Let the muffins stand in the tin for 15 minutes, then transfer them to a wire rack and cool completely. Store the muffins in an airtight container at room temperature for up to 3 days.


Let me tell you, these muffins are so lovely! The roasted apples in them tastes so delicious!!! But not at all overly sweet! Just perfect to me :) I love apples right now especially so I am a huge fan!

*Just a lil' side-note. The roasted apple recipe makes approximately 3 cups or so...I am planning on making applesauce tomorrow with the remaining roasted apples. Babycakes has a recipe for applesauce that's really simple. They say to spoon the roasted apples (from the above recipe), into a food processor or blender and add 1/4 cup Agave Nectar with 1 cup of hot water. Blend the apples until they are smooth, about 1 minute! They also recommend that if you are not using the applesauce right away, to store it in an airtight container in the fridge for up to 1 week.

Hope you enjoy these :)

Wednesday, January 19, 2011

"Babycakes"

I was given two wonderful new vegan cook/bake books for Christmas. This one was given to me by my amazing mother (Jayanna gave me the other, but I won't review it until I have more time to try the recipes).

Babycakes by Erin McKenna

I love to bake, so this was the perfect gift. I've already made the Raspberry Scones and the Pumpkin-Spice Muffins (past posts) and they have turned out amazing. To be honest, this is the perfect vegan bake book. It uses lots of specific ingredients to amp up the flavour and to keep the items healthier while being all vegan, mostly gluten-free and mostly sugar-free.


This books has great recipes from simple muffins and cupcakes to cakes and fun things like "apple-cinnamon toasties". Almost every recipe in this I would LOVE to make and gives me so much inspiration. I also love how specific the recipes are. They give a great introduction in the book about how hard they worked on each recipe to make it just perfect (which is why they explain to try to stick to the recipe ingredients and directions as much as possible, but some substitutions may work). In the directions of each recipe they often will say... "bake for 10 minutes and then rotate 180 degrees in the oven and continue to bake for 12 minutes" (which I really appreciate). They will always explain how to store the baking as well (something so useful as I'm obviously not going to eat them right away). They will explain if they should be covered/airtight, room temp/stored in fridge and how long they will keep for!

Happy baking!

"Trust is Not Enough"

I thought I would update you on one of the books I just finished. I got this for Christmas a few years ago, but it always takes me time to get through all the new books I get. I just finished this book a few days ago.

Trust is Not Enough: Bringing Human Rights to Medicine (by David J. Rothman & Sheila M. Rothman)

It is a collection of essays originally published elsewhere. Some of the topics covered include trafficking organs, prisons in India, medical research, informed consent, rights to equity and fairness in health care and the medical resident.

It's a really well written and interesting read. It's obviously not an 'easy', 'fun' or 'recreational' read, but you will learn a lot and educate yourself more about the world.

One way or another, you will be thankful that you live in the country that you live in and have then benefits that come with that (even it it's not perfect).

Happy reading!


Monday, January 17, 2011

Buying Local...During Winter!

Good Morning!

Okay, it's 7am here and I am anticipating that Noah will be up any second so I decided to just write a quick blog, but something that means a lot to me and I am very passionate about: buying local - food grown in our immediate community! I admit that in the climate we live in, there is a MUCH larger variety of local produce available during the Spring/Summer months, but buying in the Winter, depending on where you live, CAN be done! If I can't buy local, it's very important to our family that we look for the 'next best thing'! To us that includes buying organic, and looking at WHERE our food comes from. We try to stay as close to home as possible! We definitely don't always succeed (our edamame beans have come frozen from China), but we are making a conscious effort to keep the food we eat, close to our home.
Take a look at the amazing produce I was able to buy from Dan's Farm in Victoria B.C. this week: leeks, kombucha or 'sweet mama' squash, apples and parsnips! The apples are seriously the most delicious apples I've ever had! I ate two right away!!! I love the taste (and name) that the kombucha squash provides! I use the squash when roasting veggies, and making soups (Alicia Silverstone has a simple and beautiful recipe for kombucha squash soup in The Kind Diet). I love adding leek to soups and parsnips taste really great when boiled with carrots and sweet potatoes and then mashed!!! MMM!

Local produce not only tastes significantly better, but it's cheaper if you go directly to the farm itself (all the produce shown, was under $10 - apples were less than $1/pound)!

An interesting fact that I learned recently was that there is actually a term for individuals who eat local (try to maintain that 100-mile radius), that was donned by Jessica Prentice for the World Environment Day in 2005. She referred to individuals who eat local as locavores! The term caught on so much that in 2007, the New Oxford American Dictionary chose locavore as its word of the year in 2007!!! Isn't that sweet?! It gives me hope when our society is becoming more aware and accepting new ways that aren't necessarily mainstream or taught in our school system! Do you ever wonder why you walk into a generic huge superstore-grocery store and it's next to impossible to find organic OR local produce? Someone once said something brilliant to me. He said that we create the demand for the products we see in these billion-dollar grocery stores. So yes, it takes a little more time to initially educate and become aware of which stores carry the products that I want to put into my own and my family's bodies, but for me, that is precious time that I am willing to spend in order to insure that my family is being supplied and nourished in the most promising way possible! There are no 'guarantees' in life. Eat that and you will live longer! There are a lot of HUGE unknowns out there and life isn't predictable. What we do know however is that if we fuel our bodies in the best way possible and treat ourselves, and others (to me this includes animals), with the utmost love and respect, we will live the days we have ahead of us to the fullest. We will feel happier and healthier. We will look better. We will be able to think clearer. To me, eating a kind and healthy life while still ENJOYING everything that I put into my body immensely and exercising is a gift that I give myself and my future here :)
Here is an interesting and fun website that is geared for kids but aren't we all kids at heart?!!! http://calc.zerofootprint.net/youth/ is a fun way for children to calculate their ecological footprints! It also has a number of tips and ways that you can be kinder to the environment! I know that children are our future so what's a better way to educate them then to first educate ourselves about how we can be kinder to the environment?!

Ecology Fund also has a great site where you can calculate your ecological footprint by answering some quick questions and at the end it really opens your eyes by telling you how many Earths would be needed to support your current lifestyle if everyone lived that way - scary!
http://www.ecologyfund.com/ecology/res_bestfoot.html

Dan and I recently watched a really sweet documentary called No Impact Man. It's about an author who embarks on a year-long journey with his wife and young daughter to live their life (they live in Manhattan), while making no net environmental impact! It's hilarious, insane and depicts the challenges (the wife has to give up her coffee-shop addictions, shopping pleasures, make-up and live with worms - used for composting in their apartment), and simple pleasures that come from living a life this way. It's totally worth watching. After Dan and I watched it, we were left with the realization that we could never do that but what could we do. We made a pact that we would ONLY get tea/coffee out for 2011 if we bring our own mugs. Dan was given a traveling coffee mug for Christmas and I bought a water bottle and traveling tea mug for myself. So far we have stuck to our promise! Dan is great at forgetting his but amazing at saying 'well I don't really need one then anyways'! We are also composting a lot more and have Noah involved! Noah and I made 'recycling box' out of a recycled cardboard box and labeled it We are Extremely Very Good Recyclers after the book by Lauren Child about Charlie and Lola who learn about how to recycle and earn their very own real tree to plant in their school after recycling and filling their 'tree counter'! Noah loves this book and he loves helping Dan and I carry out our recycling and compost! We don't use a lot of bottles that need to go to the bottle depot but we save whatever bottles we do have and Noah gets to take them to the bottle depot once a month, and the money he receives gets put into his 'spending' piggy bank for him to put towards something he really wants (right now it's a color-changer Doc Hudson from the Pixar Cars movie)!!! Noah was given for Christmas 4 piggy banks that are labeled sharing, spending, saving, and schooling respectively. Each week we give him his allowance ($2 because he is two) and he puts $.75 into his savings piggy, $.75 into his schooling piggy, $.25 into his sharing piggy and $.25 into his spending piggy! It's a great way for Dan and I to start teaching him the importance of money and how to divide your earnings!

Anyways, I am going to finish off my random-filled blog entry by saying that one more thing that Dan and I are really working at doing in our household, is not wasting as much! We are really making the most use out of the groceries we have in our house. For example, if I make too much oatmeal, we save the rest in the fridge and eat it later. I was really sick a few weeks back and ironically it was the day after I had bought a beautiful array of produce that was just waiting to be used. Well, I was so sick (Norovirus), for 4 days that by the time I had re-gained my energy and zest for life, the produce that had been looking crisp and ready-to-use was now flacid and rather sad-looking. I felt terrible having to compost some of it but realized that there are times in life when random, unplanned things change your original plans! I ended up salvaging some of the produce however and made this stir-fry! When it was finished cooking, it looked and tasted amazing! SO YAY! I may have just not used these items before because they didn't look good but now our family is trying to use everything that we buy and only buy what we really will use/need!!!

I am proud to say that we have been walking more and leaving our van at home! We have saved a lot of money on gas and had an amazing time walking around, breathing in the sweet, fresh air and Noah loves taking turns in the stroller and then we find random soccer fields or parks along the way for him to get out and run in! Even though the weather has been dreary and grey, we still have made a point to get outside more and use our legs opposed to driving! Not always realistic, but a lot more fun when you can make the time to do so!

That's all for now! Have a very happy day :)

Sunday, January 16, 2011

Pumpkin-Spice Muffins

I REALLY tried to muster up the courage and inspiration to cook something... but alas... I baked again! What can I say? I'm a baker at heart (I will make a cooker out of me one day, though).

Today's 'challenge'... pumpkin-spice muffins (no challenge at all, such an easy and fast recipe)

Thanks again to Babycakes for the great recipe... I will visit your NYC bakery some time in my life!

Pumpkin-Spice Muffins

Makes: 12 muffins

Ingredients:
2 cups Bob's Red Mill Gluten-Free All-Purpose Baking Flour
2 tsp baking powder
2 tsp baking soda
1 tsp xanthan gum
1 tsp salt
1 Tbsp ground cinnamon
1 Tbsp ground ginger
1/2 cup coconut oil
2/3 cup agave nectar
2/3 cup rice milk
2 Tbsp pure vanilla extract
1 1/2 cups canned unsweetened pumpkin puree
1/2 cup hot water

Directions:
-Preheat the oven to 325 F and line a 12-muffin tin with cups
-In a medium bowl, whisk together the flour, baking powder, baking soda, xanthan gum, salt, cinnamon, and ginger
-Add the oil, agave, rice milk, and vanilla to the dry ingredients
-Stir until the batter is smooth and thick
-Use a plastic spatula, fold in the pumpkin and hot water until both are evenly distributed throughout the batter
-Pour 1/3 cup batter into each cup, almost filling it
-Bake muffins on center rack for 22 minutes (rotating them 180 degrees after 10 minutes)
-The finished muffins will be soft to the touch and a toothpick will come out clean
-Let the muffins stand in the tin for 15 minutes and after transfer to a wire rack to cool
-Store at room temp in an air tight container for up to 3 days


They were AMAZING


Notes: I used exactly 1/3 cup batter in each cup, but my batch made 15 muffins, not 12 (and, as you can see, the muffins came over the top, but they look great anyways!). Babycakes talks a lot about using the exact ingredients in the recipe (they are tried and tested), so be sure to use the right flour (gluten-free, all-purpose... it has quite a different texture). I used vanilla rice milk for this recipe. I had a little trouble with the coconut oil (I had to open up a new jar and I hadn't let it 'soften' enough) as I had trouble mixing it all in. My baking time was probably 27-29 minutes (not 22 minutes). The muffins were perfectly done though (not overdone, but so soft and moist that if I had taken them out a minute earlier they would be doughy).


My mom LOVED them (and so did I!). She really wished I had developed some sort of vegan 'cream cheese' icing for these (but she admits they are utterly delectable without as well)


Enjoy!


P.s. Don't you just love organizing your cupboards? We're in the process of buying matching containers and getting everything neat and organized... it's so fun!

(we still have a long way to go...)

Wednesday, January 12, 2011

Vegan Clean and Yummy Falafels!

Hello!!!

So I decided to make a dish that Noah and Dan really love: pita/wraps with hummus and falafels! Falafels can be unhealthy and some are made with bread and aren't necessarily full of healthy vegan-friendly ingredients! I have never tried making my own falafels...until now! I don't like how unhealthy most falafels are so I thought that I would try this recipe that I found in Easy Vegan for homemade, vegan-friendly clean and yummy falafels!!! I was a little intimidated at first but I decided to just go for it (when you know your child likes something then you go for it)!!! I won't lie, it was a messy process but totally worth it! We finally have a dishwasher and Dan promised to do the clean-up so that really helped ;) Anyways, I totally recommend making these falafels when you have time because they are amazing and taste clean! I don't know how else to explain it except for the fact that these falafels don't taste 'heavy' and 'fatty' and leave you feeling full and satisfied but not TOO full! So give these a try:

Vegan Falafel Recipe (recipe from the Easy Vegan cookbook)

Ingredients:
1 1/4 cups of dried chickpeas, soaked in cold water for 24 hours
2 garlic cloves, crushed
1 tsp. of ground cumin
1/2 tsp. of groung coriander
1/2 tsp. of baking soda
1/2 bunch of green onion, finely chopped
3 tbsp. each of chopped parsley and cilantro/fresh coriander (I just used parsley)
sea salt and freshly ground black pepper
sunflower/safflower oil for deep-frying (I used coconut oil)

Method:
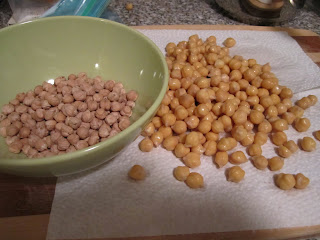
First off let me remind you that you need to start the preparation the NIGHT BEFORE you want to eat these delicious falafels! So the night beforehand, you need to take your 1 1/4 cup of dried chickpeas and place them into a pot. Fill the pot with cold water and let it sit overnight.

dry chickpeas before and after soaking!

The next day, drain them very well and place on paper towel (or a greener method is to place them onto a clean towel), to dry them.

Transfer to a food processor, add the garlic, cumin, coriander and baking soda, and blend to a smooth paste. Season with sea salt and pepper. Transfer the ingredients from the food processor into a bowl. Cover the bowl and let rest for 30 minutes (this will make it easier to make your falafel-shapes).


Add the green onions, parsley and cilantro/coriander to the chickpea paste, beat well, then knead the mixture to bring it together. Scoop out small lumps and make into flat, round cakes (your ideal sized falafel). Put them onto a nonstick tray. Cover and chill for 15 minutes.


In the Easy Vegan book, it recommends to heat the oil in a deep, heavy-based saucepan to 375 degrees F, but I didn't have a saucepan so I chose to use a deep frying pan and I turned the stove-top element to a med-high setting (6-7). Cook the falafel, in batches if necessary (I cooked the falafels in 4-5 batches), for 2-3 minutes until they are crisp and brown, turning them over once.


Lift out with a slotted spoon and drain on paper towels. Serve hot or warm, with pita bread, on a salad, or in a wrap!


I served these falafels on brown rice tortilla wraps with daiya cheese, hummus, chopped tomatoes, cucumbers, peppers, spinach, red onion and avocado! It was so delicious! This is a wonderful family-friendly recipe which will be loved by all ages! My 2 year old loves making wraps and choosing which ingredients he wants to add to his wrap! No matter what he chooses, I am comforted that they are healthy-choices!

My boys showing off the falafels and condiments!

Noah enjoying his wrap :)

My outstanding husband who is not only a patient, kind man who always supports my creations and my blogs, but just the best friend anyone could ever ask for!

Enjoy!